It is a common problem to encounter an issue with a laptop’s keyboard. Having a broken Asus laptop keyboard can make it difficult to type correctly and in a timely manner. If your Asus laptop keyboard is not working correctly, the good news is that there are easy steps to diagnose and fix the issue. This step-by-step guide will walk you through the process on how to repair your broken Asus laptop keyboard.
The first step in repairing a broken Asus laptop keyboard is to inspect the physical condition of the laptop. Check the keyboard for any signs of visible damage such as broken keys, dirt and dust build-up, moisture, or a faulty connection. If any of these are present, the cause of the issue may have already been identified.
Step 1: Identifying the Problem

Before you start trying to fix a broken Asus Laptop keyboard, it is important to first identify what the problem is. This will help you to determine the best way to repair it. Start by determining whether the keys are not responding, have stopped working altogether, or if the laptop itself is not recognizing inputs from the keyboard. Once you have identified the issue, you can begin to work on finding the best solution.
You can begin by checking for physical damage to the laptop and keyboard. Look for signs of liquid damage, dents, and other forms of physical damage. If you find any, you may need to replace the keyboard or laptop entirely due to the damage. In some cases, it may be possible to repair the physical damage. However, this should be done by a professional, as it may require special tools and parts.
If the physical damage is not the issue, you can check for any loose connections or damaged components. Try reconnecting the keyboard to the laptop, and check the wires for any tears or signs of wear and tear. If you find any, you may need to replace the damaged components to restore the keyboard’s functionality.
By identifying the problem with the laptop keyboard, you will be able to better assess the best repair option. This will help save time, money, and ensure a successful repair.
Step 2: Pre-Installation Preparations
Step 2: Pre-Installation Preparations
Before you start replacing the laptop keyboard, you need to prepare the necessary tools and materials. This includes a Phillips head screwdriver, an ASUS laptop keyboard replacement kit (often sold with the laptop), and a can of compressed air.
Also important is to make sure that the keyboard replacement is compatible with your laptop model. You can check this by looking up the laptop model number or by referring to ASUS product support website.
Once you’ve gathered the necessary materials, make sure to clear the workspace. This way, you can easily identify any screws and parts that may have gotten misplaced in the process.
Before you start disassembling the laptop, make sure to switch it off and remove the battery. This will help prevent any accidental short-circuiting while you work on the keyboard.
Keep in mind that handling parts of a laptop is delicate business, so be careful while unscrewing and unplugging the laptop components. Good luck!
Step 3: Installing the New Keyboard
Once you have all the necessary tools and replacement keyboard ready, the next step is to install the new keyboard. Here’s how:
- Turn off the laptop and unplug it from the power outlets, the battery should be detached too.
- Once the laptop is completely shut down, open the display assembly to expose the laptop keyboard.
- Locate and remove the screw cover from the laptop bottom. You may find some screws in the back or on the side.
- Removing of all the screws is crucial. Otherwise, you can’t pull the keyboard.
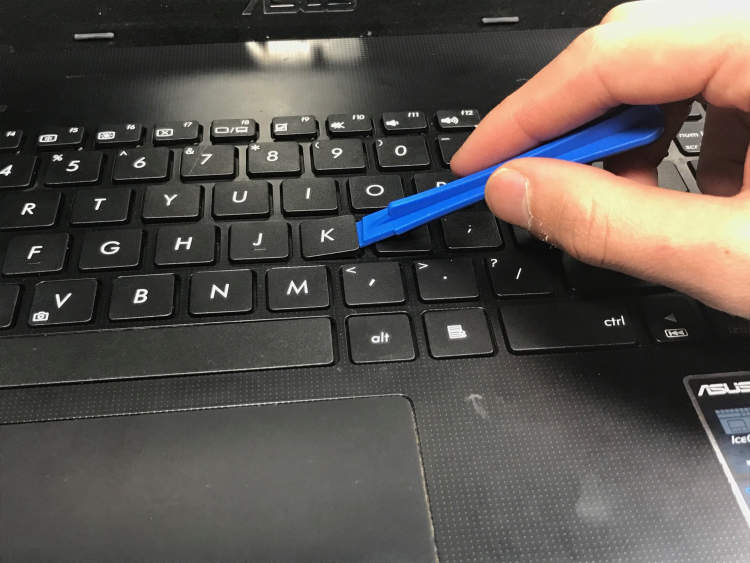
- Carefully insert a small flathead screwdriver into the corner of the laptop and carefully pull it out to disconnect any cables connecting the laptop’s keyboard to the motherboard.
- Once the keyboard is disconnected, you can now unplug the damaged keyboard and replace it with the new one.
- Before you plug in the new keyboard to the laptop, make sure to line up the connector pins of the new keyboard with the laptop motherboard.
- When everything is in place, gently lock the new keyboard into place by screwing it back in.
- Once the new keyboard is connected and secured, you can now retest it. Plug the laptop back in and switch it on.
After performing these steps, your laptop should now have a new keyboard installed.
Conclusion
In conclusion, fixing your broken Asus laptop keyboard need not be as daunting as it may seem. With the help of a detailed step-by-step guide and the right tools, you can get the job done with ease. Follow the guide, stay calm and be sure to be gentle with the laptop parts and you should be able to repair the keyboard in no time.